DIY Rustic Fireplace Mantel


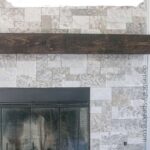

We recently built our own DIY Rustic Fireplace Mantel!!! If you missed it, we did a major fireplace update recently installing Faux Stone. So to get the look I was going for we decided to build our own mantel. I just love this fireplace makeover!

I looked at different mantel options when we decided to update our fireplace. The range of pricing was huge from a few hundred to thousands of dollars. This mantel cost us under $50!!!
So if you can build it yourself, why not?

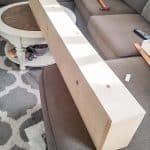
You’ll need to adjust the board sizes to fit your mantel size to make this tutorial work for you. You’re creating a hollow box with an open backside. All the look of a wood beam mantel without the cost or the weight.
DIY Fireplace Rustic Mantel Material List:
Affiliate links are provided for your convenience.
- two 1″x 10″ x 6′ common pine boards
- two 1″ x 6″ x 6′ common pine boards
- two 2″ x 4″ x 8′
- miter saw, my favorite here
- sander, my favorite here
- nailer, my favorite here
- drill, my favorite here
- stud finder
- 2″ wood screws
- 1 1/2″ brad nails
- stainable wood putty
- kona stain
- foam brush
Wood Cut List for the Pieces of Wood You Need:
2″ x 4″‘s
- two 28″ long
- four 9″
1″ x 10″‘s
- two 70″
1″ x 6″‘s
- two 9 1/4″
- 71 1/2″
How To Build A Rustic Mantel
We started by assembling the cleats that would be holding the mantel to the wall.

You’re going to use the 2″ x 4″‘s for this. Take your 28″ pieces and attach a 9″ piece on either side. We used the 2″ wood screws to secure them together.
Then using your stud finder, secure the cleats to your wall, using the 2″ wood screws to attach to the studs.

Now it’s time to build your fireplace mantel box. Your 1’x10″ lumber pieces are the top and bottom of the DIY mantel. The 1″x6″ pieces are the sides. Use your nailer to attach all the pieces. You can use wood glue between the pieces before using your nail gun if you prefer, that can help tighten up your seams if you want a cleaner look.
Fill in the nail holes with wood putty. Once the putty is dry give the mantel a really good sanding with some medium grit sandpaper.
Then I took a couple of wet paper towels and wiped down the wood to get all the excess sawdust off before staining. You can distress your mantel by hitting it with a hammer or banging it with some chains.

Kona is my go-to wood stain in my home! I love its deep, rich tones, yet you can still see the grain. Then apply the stain with a foam brush and then wiped it off with an old rag a couple of minutes later. I like to use the stain with the polyurethane included. This mantel didn’t need multiple coats of poly, so that makes it much easier to finish your new mantel.
Once it was dry it was time to put up the wood mantel!!!

We just slid the mantel onto the cleats. We used the 2″ wood screws to attach the mantel to the cleats, placing one screw on either side of the mantel. You could also attach the mantel from the bottom of the mantel to the cleats.

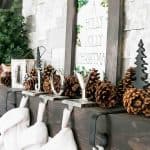
Oh, how I love how it turned out!!! Just a couple of hours of work and you can build your own DIY fireplace mantel too! It adds so much great warmth to our living room. Of course, once it’s finished you get the fun of decorating it.


Did you install the rock around the fire fireplace.? HOw did you do it, I want to put rock around mine .
We did!!! Here’s a post all about it! https://www.domestically-speaking.com/diy-faux-stone-fireplace/
I love the mantel and I would love to do one myself, but I have a brick fireplace. Any ideas on how to do attach it to brick?
Thanks,
Airstone can be attached to brick! https://www.airstone.com/faqs
Attach the 2×4’s with Tap cons.
What Kona stain you used
Hi Richard! In the supply list above I have a link to the exact one I use and love!
How wide is your mantel? I am looking for the measurements so I can make min accordingly. You did an awesome job, greatly appreciate it!
Ours is 71 1/2″ long
Beautiful I love it and what a great job
Thank you Norma!!