
Making a Burlap Memo Board
Hi guys! I’ve been hanging out at the beach this week, enjoying the last bits of summer vacation we have left. I received some questions about my burlap memo board I shared at the Power of Paint Party, so I thought I share the simple plan I used to make it.

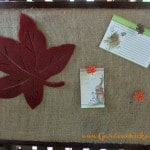
Here’s my cute memo board painted my new favorite color! I bought this frame last year and I had originally painted it black. I found it at a garage sale as just the plain frame. I loved it because of it’s size.
I had been using it to hang some of my burlap signs like this one…

Since the frame came with no backing I took a piece of foam board (I got mine at Michaels) and cut it to fit the opening.
So to make my memo board I took some leftover corkboard (from my daughter’s wardrobe) and some spray adhesive. I generously sprayed the foam board with the adhesive and then pressed the cork firmly on top for a minute or two.

You can see that my scrap piece wasn’t in the best condition, a rip & a tear, but once it’s covered with burlap no one will know.
I let it dry about 20 minutes and then wrapped it with burlap ( I cut it to fit and ironed it). I used some thick masking tape to hold the burlap on the back of the foam board until I placed it in the frame.

Now I just need to make some cute pushpins for it!
Hope you’re enjoying the last of your summer too!
Thanks for stopping by…

Great makeover. Memo boards are so useful, I love them.
page rank check seo link exchange backlink service buy cheap backlinks
This turned out great! I love quick projects like this. Thanks for sharing.
I absolutely love how this turned out! So cute. Gotta love a good, quick project involving some burlap!
I love quickies! cute & practical!
enjoy the rest of YOUR summer… I am ready for it to LEAVE, too dang hot to suit me.
gail
Love the bulletin board. I just recently upcycled an old mirror frame for a chalkboard/bulletin board. I used vintage earrings for my pushpins. https://frecklednoses.blogspot.com/2011/07/chalkbulletin-board-for-under-20.html
Love your blog.