How to Install a Cedar Plank Bathroom Wall
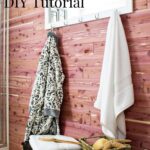
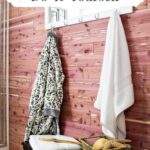

Today I’m sharing how to install a Cedar Plank Bathroom Wall. I’m so excited to share with you guys our latest DIY project. We recently added cedar planks to a wall in our master bathroom right next to our shower, and I love the rustic glam it’s added to our space.

Every time I walk into the room I feel like I’m in a spa sauna or a rustic lodge. It has created this calming, relaxing feeling in our bathroom with that rustic look.
Materials And Tools
Here are the materials we used to create our beautiful cedar plank wall.
Affiliate links are provided for your convenience.

Laying The Planks
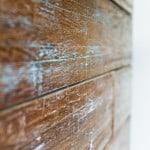
We used CedarSafe Natural Closet Liners for our plank wall. We first marked the studs by drawing a line from the floor to the ceiling. This made it super easy to see where the stud was as we moved up the bathroom walls. We started at the baseboards and started with two full-length cedar panels. You want to use a staggered pattern so that the board ends don’t line up in a straight line from floor to ceiling. We looked to have at least a foot between the lines as we went up the wall. Our miter saw made the cuts super simple and we just brought the saw up into our bedroom for even quicker installation. They were so easy to install with the tongue and groove edges. We used a nail gun for easy installation.

How To Install A Cedar Plank Bathroom Wall
Installing our cedar plank wall only took a few hours because we had our supplies ready to go. I hope this tutorial will show you how easy it is.
The first step is to find your studs. Make sure you make a line where the studs are from floor to ceiling to make installation quick.
Have your nail gun and miter saw ready to go. Make sure your battery is charged if needed for those tools.
Start at the base and work your way up. Remember to stagger your seams at least 12 inches apart so that your wood wall will look beautiful.
There are such beautiful variations of colors in the cedar. And it smells wonderful! A cedar plank bathroom wall is a fun twist on the popular shiplap look

It has changed the whole feel of the room and it only took about 1/2 day with breaks.

It’s a beautiful, rustic addition to a room. It’s going to pair perfectly with the glam that I’ll be installing on the other wall.

Thanks for stopping by… I’m hoping to have some more of the bathroom makeover to share with you next week.
Thank you to Cedar Safe for sponsoring this post and for supplying me with cedar planks for this project, as always, all opinions are my own.

Fantastic makeover! I love cedar as well. Are the planks treated or did you have to seal them?
They come ready to use, no need to seal 🙂
Looks beautiful! I love the look and smell of cedar. What a great idea.
Wow! Gives it a spa look. I bet it smells wonderful!!
This is really beautiful! I bet it smells fantastic, too!
This looks beautiful! I love planked walls. 🙂
So my grandparents home smelled like mothballs growing up. This is SO MUCH BETTER of a solution! I love the smell of cedar!
this turned out amazing, can’t wait to see the rest!
Not sure we’d go for cedar planks in bathroom but the idea of even one wall with planks sure appeals to me. I would paint them white to keep room nice and light, just have to decide which wall/walls to apply planks, then there’s convincing hubs it would be good idea. Would be extra insulation at least on walls. Would like some planks on bedroom walls also.
The cedar does look so spa-ish in your bathroom, I can only imagine room smells so nice with cedar. Lucky you getting planks for free, one of blogger goodies. Happy week
Of you paint then you might as well use pine.