How To Make A Cane Wrapped Vase
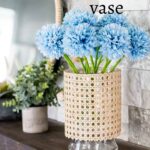


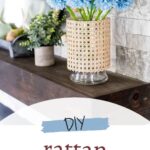
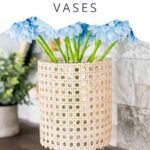
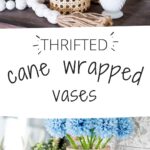
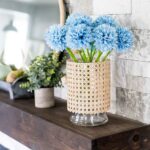
In this tutorial, we’ll show you how to transform a plain vase into a beautiful cane wrapped vase using easy-to-follow step by step instructions and photos. I took two thrift store vases and turned them into beautiful coastal cane wrapped vases.

I love the look of beachy, coastal decor! While browsing online I came across a set of two canned wrapped vases, that are similar in size to what I created, that sell for almost $200!!! The cost of the thrift store vases and the cane material cost me around $20! What a price difference! I find that savings alone to be major inspiration to make your own tropical vibe home decor vases.
What is Cane?
Cane wrapping, also known as cane weaving or cane webbing, involves the use of thin strips of cane or rattan to create decorative patterns or cover surfaces. Cane is a flexible material derived from the bark of various types of vine-like plants, commonly found in tropical regions. It’s often used in furniture making, basket weaving, and a variety of crafts. It has become very popular again in the past years and you’ll see it in the back of chairs, dresser drawers, etc.
Materials Needed
Affiliate links are provided for your convenience.
- thrift store vases
- cane webbing material (one I used)
- scissors
- hot glue gun and hot glue sticks
- faux flowers I used
What Type of Vase Works Best
To create a cane vase, you want a big portion, at least 4 inches, of your glass vase to be straight up and down.

Here are the vases I used. You can see the smaller one is straight up and down at the bottom of the vase, where the larger vase has the straight up and down on the upper portion of the vase. Trying to adhere the cane to the curved portion of a vase would be very hard to do, and frankly wouldn’t look as clean of a finished product.
So definitely look for those vases that have a large portion of the vase going straight up and down.
How to Wrap the Vase with Cane
Clean the Vases
The vases I purchased at my local thrift store were pretty clean, but once I removed the price tags I gave them a good cleaning to remove any sticky residue. If you have residue that doesn’t come off easily you can try white vinegar or Goo Gone.
Measure and Cut the Cane Webbing
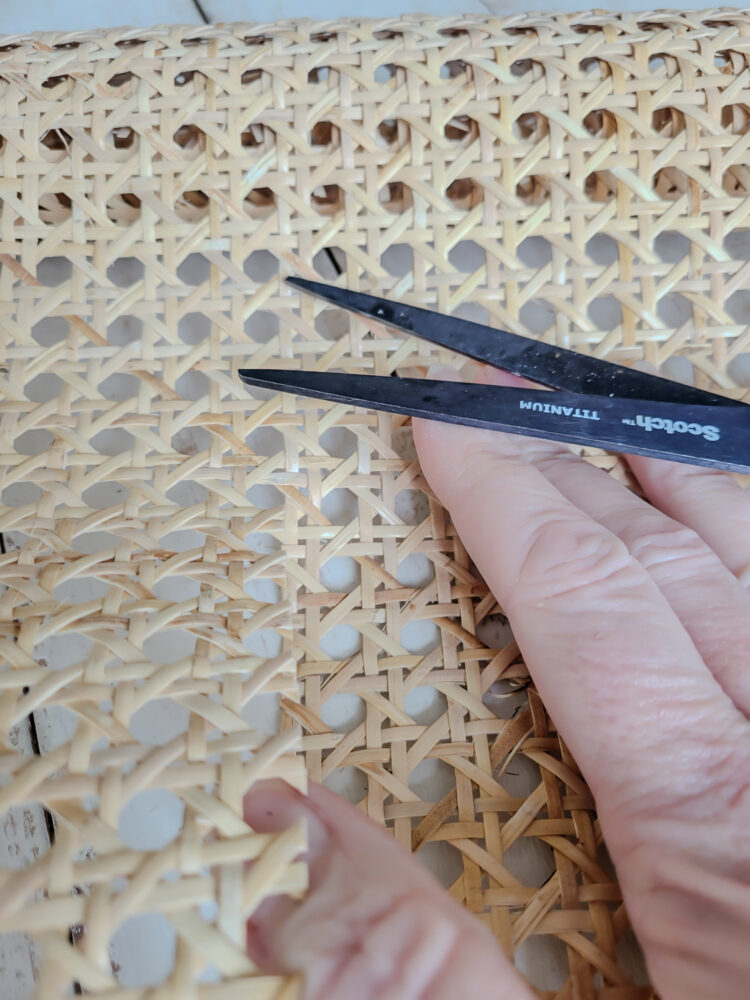
Start by measuring the height of the straight portion of your vase. Then you need to measure the circumference (around) of the vase. I added 1 inch onto the circumference to have a slight overlap. Then, using your scissors, carefully cut a strip of cane webbing to match. Now when you examine your cane you’ll notice the patterns. I adjusted my measurements slight to cut the cane at the area I thought would look best.
Apply Glue to the Vase
Once I had my cane cut I added a lone line of hot glue to the clear vase, going from the top to the bottom of the straight area that I wanted to cover with cane webbing.

I let the glue sit about 5 seconds before pressing the end of one side of the cane to the glue. Be careful as the hot glue will still be very warm. It’s good to have a bowl of cool water nearby to dip your fingers into if you get hot glue on them.

You can see that the raw edge of the cane looks rough. I chose to wait until the cane was glued to the vase before trimming that off. So I let the glue dry about a minutes, then trimmed that excess off.

Wrap the Cane Webbing Around the Vase
Then I wrapped the cane around the vase, making sure that the top edge of the cane matched up to the top of the vase. I then added more hot glue right on top of where I first adhered the cane material. That way the cane would just overlap the seams.

Follow the same steps by waiting a bit and then pressing down carefully. After letting the glue dry for a minute, trim off any of the excess natural rattan edge that you don’t like the look of. You can go more rustic or a more clean finish, depending on what texture finish you like. If you need to, you can add a bead of hot glue or or there to get that finished look you like.

Use your Cane Wrapped Vase
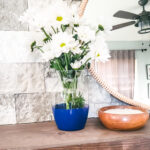
After your vase if finished it’s time to style and enjoy your beautiful vases. I filled mine with some beautiful faux flowers (link is above), but some fresh flowers, like hydrangeas would be gorgeous to go with the coastal vibes of these DIY cane vase makeover.

I also think they were be gorgeous as a candle holder, especially the larger vase I found. Wouldn’t the light filtering through be so pretty?

This is a an easy DIY project that was so much fun to do. I can’t wait to try this on some cane furniture in the future.


I had this idea last week of using cane, but don’t know where to get it. Weird that it showed up for me to see.
That is such a cute idea! I didn’t even know they sold cane in sheets like that!
The link to the ematerials needed wasn’t included…where do you buy the cane material?
Paula
[email protected]
I can’t wait to make these. They look like they just came from Serena and Lilly without the high price tag!
Love how it instantly gave it a beautiful update!
What a great idea! The cane adds so much texture. Pinned.