
Snowy Pine Cone Cluster
Want to add a little snowy sparkle to your Christmas decorating? These DIY snowy pine cones are such an easy way to bring a touch of winter into your home!
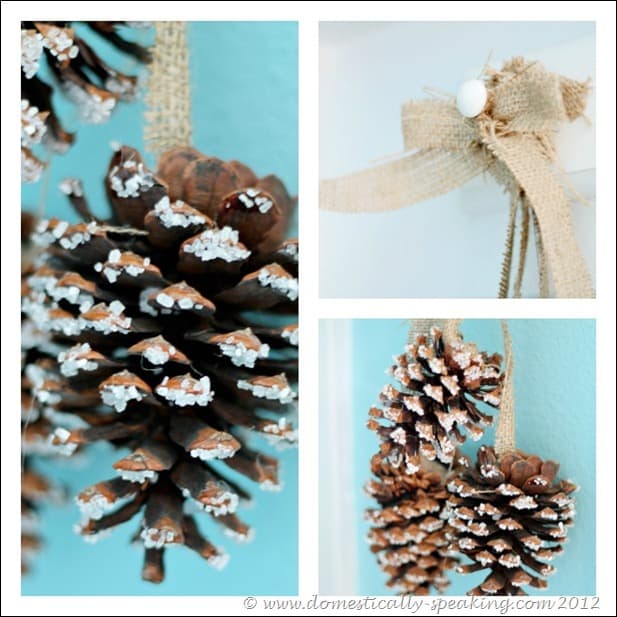
I made these using Epsom salt and Mod Podge to give ordinary pine cones a beautiful frosted look. Then I added strips of burlap to the bottom of each pine cone and gathered them together to create a rustic hanging cluster.
I originally hung mine in our bathroom, but these snowy pine cones are pretty enough to display just about anywhere. You can hang them from a mirror, add them to a Christmas mantel, or use them as part of a winter centerpiece.
This is also a fun craft to make with kids. My youngest daughter helped brush on the Mod Podge and sprinkle the Epsom salt over the pine cones. It’s a simple project with a lovely wintery result!

Supplies for Snowy Pine Cones
Here’s what you’ll need to make your own Epsom salt pine cones:
Affiliate links are provided for your convenience.
- Pine cones
- Epsom salt
- Mod Podge
- Foam brush
- Burlap ribbon
- Hot glue gun and glue sticks
- Scissors
You can use pine cones you’ve collected outdoors or purchase them at a craft store. I love using natural pine cones because their different shapes and sizes give the finished cluster a collected, rustic look.
How to Make Snowy Pine Cones
Step 1: Prepare Your Pine Cones
Start with clean, dry pine cones. If you’re collecting them outdoors, remove loose dirt, needles, and debris before beginning.
Lay out your supplies so everything is ready to go. I like working over a tray or piece of paper because it makes it easier to catch the extra Epsom salt.
Step 2: Brush on the Mod Podge
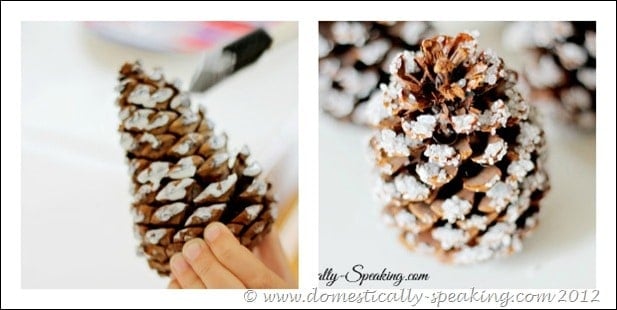
Using a foam brush, apply Mod Podge to the pine cone.
Work the adhesive over the outer scales of the pine cone, adding enough to give the Epsom salt something to stick to.
You can cover as much or as little of the pine cone as you’d like. Leaving some of the natural brown pine cone showing creates a pretty contrast with the white crystals.
Step 3: Sprinkle on the Epsom Salt
While the Mod Podge is still wet, sprinkle Epsom salt over the pine cone.
Turn the pine cone as you work so you can cover the different sides. The salt crystals catch on the adhesive and create that lovely snowy appearance.
I recommend doing this over a tray or shallow container so you can catch the excess salt and reuse what hasn’t been contaminated with glue.
Set the pine cones aside until the Mod Podge has dried.
Step 4: Add the Burlap Strips
Once the snowy pine cones are dry, cut strips of burlap ribbon.
Using your hot glue gun, attach one end of a burlap strip to the base of each pine cone. These strips will allow you to gather the pine cones together into a hanging decoration.
I love the combination of the rustic burlap with the frosted white crystals. It gives the finished project a simple, natural Christmas look.
Step 5: Gather Your Snowy Pine Cone Cluster
Once the burlap strips are attached, gather several pine cones together to create a cluster.
Arrange the pine cones so they hang at slightly different heights and the snowy surfaces are visible. Adjust the burlap strips until you’re happy with the shape and balance of the cluster.
Secure your gathered arrangement so the pine cones stay in place, then choose a spot to display your finished decoration.
How to Decorate with Snowy Pine Cones
I originally hung my snowy pine cone cluster in our bathroom for a little wintery touch. I loved how the frosted pine cones looked hanging together!
There are plenty of other ways to use this easy Christmas craft:
- Hang them from a mirror: A cluster of snowy pine cones makes a pretty addition to an entryway or bathroom mirror.
- Decorate a Christmas mantel: Drape or hang the cluster alongside greenery, candles, and other rustic decorations.
- Add them to a winter centerpiece: Place snowy pine cones in a bowl or arrange them with evergreen branches.
- Use them on a Christmas tree: Make smaller versions and use them as rustic ornaments.
- Decorate a holiday vignette: Add them to a basket, tray, or shelf with other natural winter decorations.
You can also make individual snowy pine cones without the burlap strips and tuck them into bowls, baskets, and other holiday displays.

Do Epsom Salt Pine Cones Shed?
A reader asked whether the Epsom salt crystals fall off after the pine cones are finished.
I gave mine a gentle shake to remove loose salt that might have been caught between the pine cone scales. That helps remove excess crystals before displaying them.
Some loose crystals may still come away over time, especially if the pine cones are bumped or handled frequently. I recommend displaying them somewhere they won’t be constantly touched and placing a tray or decorative surface underneath if you’re concerned about loose salt.

More Ways to Use Snowy Pine Cones
You don’t have to stop with a hanging cluster! Once you’ve made a batch of frosted pine cones, you can use them throughout your home.
Try mixing them with natural pine cones, evergreen clippings, burlap ribbon, white candles, or other rustic Christmas decorations.
I also love the idea of using them in winter decor after Christmas. Pair them with neutral colors, greenery, and natural wood accents for a cozy winter look that doesn’t feel overly holiday-specific.

An Easy Christmas Craft with a Pretty Winter Finish
I love simple projects that take an inexpensive natural item and turn it into something special. These snowy pine cones are a great example!
The Epsom salt gives the pine cones a frosted look, and the burlap strips make it easy to turn several into a pretty hanging cluster.
Whether you hang yours from a mirror, add them to your mantel, or use them in a winter centerpiece, they’re a lovely way to bring a little snowy charm into your home.
Happy crafting!

Other Christmas Decorating
- Christmas Home Tour 2013
- Burlap & Plaid Christmas Ornament
- Brown Paper Packages… Simple, Beautiful Christmas Wrapping



Such a plain and simple yet very effective idea. I’m visiting from Creative Cain Cabin and the link up she has there.
I was looking on Home talk & saw this wonderful craft, I Clicked the link to see the step~by~step instructions & was brought to your page. 1) I love the great idea. I have had these pinecones for about 7yrs. now, They range from very large to tinny tiny… I can’t wait till my daughter gets home from school, I’ve got the pinecones, glue, ribbon & Epson salt all ready to go. 2)Love your page & wonderful ideas, Thank you….
So easy, so cute! I can’t wait to make mine! Thank you for the great idea. XOXO
So pretty, Maryann!
These are seriously stunning!!! I love love love them! So elegant and rustic, they will look beautiful in so many places. Nice job!
Thanks Taryn!
Lovely pinecone project and I love the way you hung them! xo
I love the sparkling elegance of the epsom salts on the natural tones of the pinecones. Beautiful!
Maryann, wishing you and your family a wonderful Thanksgiving holiday!
Jenn
Thank you Jenn!
I love this idea! Hope you don’t mind if I make some of these adorable ornaments for my tree. I am doing a rustic, country theme this year and these would be perfect 🙂
Of course not, I’m flattered Taunnie!
I’ve never visited your blog, but I saw your pic on Pinterest. I really like how you’ve hung yours with the burlap strips. I’ve been painting and glitterizing pine cones today. It seems that this is the year of the pine cone!
I totally agree Jane! I’m crushing on pine cones this year. Glad you stopped by!
That’s a really cute idea, and it looks so simple. I have to try it!
Thanks Mrs. Match!
Those are so super cute! I have this big bag of Epsom salt and now I think my daughter and I will be Mod Podging and Epsom salting everything … starting with some pine cones for the bathroom. I, liked the bazillion of others, will be pinning!
🙂
Linda
Thanks Linda ~ I told my girls to keep their eyes open for pine cones… I am just LOVING this look!
I’ve seen a lot of projects made with Epsom salt and was wondering if the crystals shed? Also would they damage the floor or furniture if they fell off. The pine cones look really pretty and I really want to try this.
Dorothy F ~ I gave them a gentle shake to remove the excess salt that might be stuck between. I have no idea on the damage issue. I guess it’s possible. I’d happily tear out all my flooring tomorrow, so it wasn’t on my mind. I put epsom salt on plastic Easter eggs a few years ago and when I pull them out of storage the salt is still intact, so it seems to help well.
Would you mind sharing what you did with Epsom salt and plastic Easter eggs? I just used your pinecone project with my daycare kiddos…as young as 16 months! I had a ton of pinecones but am so over the turkeys made with pinecones! Anyway, it was so easy to do with daycare so I thought Id see what you did with your plastic eggs and salt?
Yep, this is awesome!!
This is an easy sweet project. The effect is beautiful and really looks like snowy crystals! Love the background color with those pinecones!
Thanks Yvonne!