
Ombre Bedroom Walls Tutorial


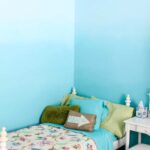
Want to give a room a little more personality without adding wallpaper or a complicated wall treatment? Try painting an ombre wall! This DIY paint technique blends colors from dark to light, creating a soft gradient that can make a bedroom feel extra special.
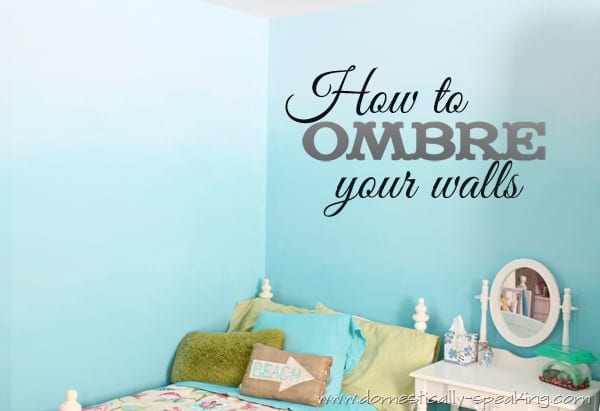
I used this technique to give my daughter’s bedroom a beachy makeover. She loves all things coastal, so we chose two shades of blue and blended them together to create several beautiful hues across the walls.
The best part? You don’t need a whole collection of paint colors. We started with two similar shades and mixed them to create a third color for the middle section.
It takes a little patience, but the finished look is worth the extra effort!

What Is an Ombre Wall?
An ombre wall is a painted wall where one color gradually transitions from darker to lighter. The traditional look often starts with a darker shade near the bottom and fades into a lighter shade toward the top.
You can create an ombre effect with blues, greens, pinks, neutrals, or just about any colors that work with your room. For this bedroom, I chose shades of blue to create a soft, beach-inspired look.
You can paint one accent wall or use the technique throughout an entire room. We decided to paint the whole bedroom, but an accent wall would be a great place to start if you’re trying this technique for the first time.
Supplies for Ombre Wall Painting
Affiliate links are provided for your convenience.
- 2 similar paint colors
- I used teal blue shades, pick 2 color on a paint swatch sample
- 3 paint trays
- 3 paint rollers
- paint brush
How to Paint an Ombre Wall
The trick to getting a soft ombre effect is working in smaller sections and blending the paint while it’s still wet. I recommend working on a section about 4 to 6 feet wide at a time.
Before you begin, protect your floors and nearby surfaces, prepare the wall as you normally would for painting, and have all three paint colors and your supplies ready to go.
Step 1: Cut In the Top and Bottom of the Wall
Start by using your paintbrush to cut in along the ceiling with the lightest shade of paint.
Next, cut in along the baseboard with your darkest shade. I like using an angled paintbrush for this part because it makes it easier to get a clean line.

Step 2: Mix the Middle Paint Color
Pour some of your light and dark paint colors into a separate paint tray and mix them together to create a medium shade.
This gives you three colors to work with:
- Light paint for the upper section
- Medium paint for the middle section
- Dark paint for the lower section
You don’t need to mix the entire cans together. Start with a manageable amount in your tray, and mix more as needed. Try to keep your middle color consistent as you move around the room.
Step 3: Paint One Section at a Time
Working in a section about 4 to 6 feet wide, roll the lightest color across the upper part of the wall.
Then use the darkest color along the bottom portion of that same section.
Finally, roll the medium shade into the space between the light and dark paint.
The three colors should meet while they’re still wet so you have time to blend them together.

Step 4: Blend the Colors
This is where the ombre magic happens!
Using a clean, dry brush, make loose X-shaped strokes where the colors meet. Work back and forth between the shades, bringing a little of the lighter color into the medium section and a little of the darker color upward.
I worked up and down along the areas where the colors met, gradually blending them until the transitions looked softer.
Keep moving while the paint is wet. That’s why working in smaller sections is so helpful. If you try to paint too much wall at once, the edges may begin drying before you have a chance to blend them.
Step 5: Continue Across the Wall
Once you’ve blended one section, move to the next 4-to-6-foot section and repeat the process.
Keep your paint colors and blending technique consistent as you work around the room. Take a step back every so often to look at the overall effect and see if any areas need a little more blending.
Remember, the goal is a gradual transition between shades rather than three distinct stripes of color.

My Ombre Bedroom Wall Colors
For this bedroom, I used two shades of blue:
- Hawaiian Sky: The lighter blue
- Half Moon Bay: The darker blue
The middle shade was created by mixing the two colors together.
I love how the different shades of blue blend together. The finished wall reminds me of the colors in a beach sunset!
The process takes a little longer than painting a wall one solid color, but having the paint trays and rollers ready makes it easier to keep moving.
Tips for Getting a Beautiful Ombre Paint Effect
A few things can make this project go more smoothly:
Choose colors that work well together. Two similar shades are a great starting point. Choosing colors from the same paint swatch can help you find a coordinated combination.
Prepare all your supplies first. Have your paint trays, rollers, brushes, and mixed middle shade ready before you start painting.
Work in smaller sections. A 4-to-6-foot section gives you a more manageable area to blend before the paint begins drying.
Keep the paint wet where the colors meet. Blending is much easier when the paint is still workable.
Use a light touch when blending. Start with gentle X-shaped strokes and gradually soften the transition. You can always blend a little more.
Take a step back. Looking at the wall from across the room helps you see whether the gradient feels smooth and balanced.
Can You Paint an Ombre Accent Wall?
Absolutely! You don’t have to paint an entire bedroom to enjoy this look. An ombre accent wall can make a pretty statement behind a bed, behind a desk, or in a reading nook.
You can also adapt the colors to fit your decorating style. Soft greens or sandy neutrals would be lovely for a relaxed, natural look, while pinks and warm peach tones could create a fun bedroom feature.
The Finished Ombre Bedroom Walls
I love how this paint technique transformed my daughter’s bedroom into a more personalized space. The different shades of blue give the walls so much more interest than a single paint color, and the beachy look was exactly what we wanted.
You could definitely use this technique on just one accent wall, but we decided to go all in and paint the entire bedroom.
If you’ve been wanting to try an ombre paint project, I hope this tutorial inspires you to give it a go. Choose two colors you love, grab a few rollers, and have fun blending!

The lighter shade of blue paint we used is Hawaiian Sky and the darker shade is Half Moon Bay.
This process does take a little more time than painting just one color, but once you have all your supplies/trays set it moves pretty quickly. I love how you get the different hues of blue. It reminds me of a sunset.

Other Bedroom DIY Projects




I’m trying to think outside the box for a wall that runs from my kitchen to my den in our condo. How do you think this would work doing it vertical rather then horizontal?
Hi Mariyaan,
The colors are beautiful . If I am using Benjamin Moore what color shades do I pick to keep the same wall color
Hi, I’m not familiar with Benjamin Moore’s paint colors. I would recommend going to their store with a screenshot and ask their color consultant for help in matching.
hi can i know what shade grade of blue you use on the wall?id like to do same with our room
thank you!
The paint colors are listed in the post.
Thank you sooooooooooooo much for sharing this. I followed your tutorial and came up with my own Beachy bedroom. I LOVE IT!!!
https://34creations.com/?p=133
hoping you will find this and have an answer for me…
in your instructions, you state: ‘5th- Roll the top 2/3s with the lightest shade.’
is this correct, or did you mean ‘Roll the top 1/3 with the lightest shade.’
i am about to try this is my granddaughter’s room and after all the new sheetrock hung and mudding work done, i do not want to get it wrong…
This wall is absolutely gorgeous! Thank you for sharing how you did it.
THe wall are so pretty! Thanks for the tutorial!Xo
Very nice! I was wondering though ….. I have a palette that I’ve used throughout my house. We’ve used the lightest, middle, and darkest colors from *one* paint chip card. Would that have the same effect without mixing the lightest and darkest? Seems like it would be okay. Thinking this might be the way to go in my basement craft room area. 🙂
so pretty Maryann. I’m sure your daughter loves them!
I’ve painted many ombre walls It is rare that I’m ever pleased with the outcome. So the final results typically don’t last long before I paint over it. There are rare exceptions and I love the look. But … after reading your article I’m willing to give it another try. My method was a little messier bc I didn’t use different rollers. I also complicated the ombre effort by choosing more than just a dark color and a light one then blending. I had dark blues to soft browns or black, red bases to soft yellow tops. My blending was great but it was too complicated. I’m gonna give it another try by keeping my gradient simple. “Solamente dios sabe” if this will work. Thanks for the article!
Marianne, I am in love with those ombré walls! Nice job and thank you for the instructions to recreate the effect. Hope you are doing well ;-).
Thanks Brittany!
Such a pretty colour and I love the effect!!!
Thanks Anne!
This is such a beautiful project. I have shared it all over… it’s just so pretty! The color is mesmerizing 🙂
Thanks so much for hosting!! Shannon
Thank you bunches Shannon!
I love the look of this! My girls would love to have ombre walls!
Thanks Kim…
Thanks Maryann for the link up, this is my first party. Love the Ombre room, so pretty! I linked up a Front Porch Chalkboard, it’s a paint project. 😉 Have a great day!
wow these look so awesome! Great tutorial!
Great tutorial. I may just try this someday.
wow!! those ombre walls look beautiful!!
Thanks so much for hosting the party 🙂
Thanks Christina!
Your ombre walls are beautiful. So soothing. Thanks for hosting.
Thanks Joselyn!
Thank you for hosting! Wishing you a grand week. Toodles, Kathryn @TheDedicatedHouse