
How to Make an Acorn Wreath
Looking for a simple way to bring a little bit of nature into your fall decorating? This DIY acorn wreath is a sweet way to turn a collection of acorn caps into a rustic piece of autumn decor!
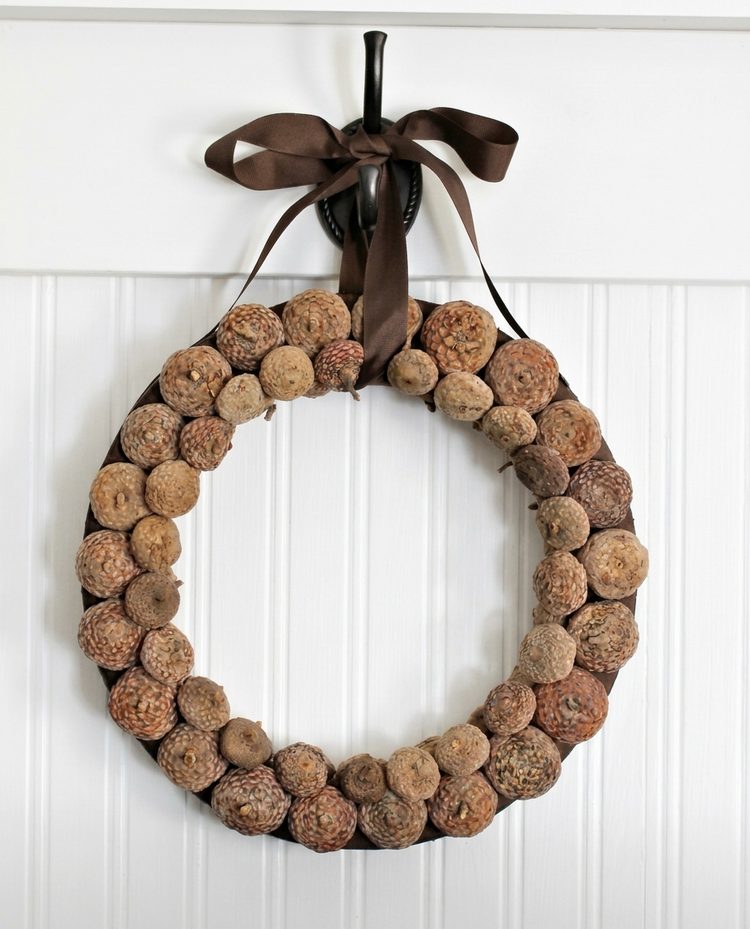
I made this wreath using acorn caps we collected while apple picking. I started with a Styrofoam wreath form, wrapped it in brown grosgrain ribbon, and then layered the acorn caps over the surface with hot glue.
I love how the natural texture of the acorn caps gives this wreath a woodsy, collected look. It’s a fun fall craft that lets you use something from nature to create decor that feels special and personal.
If you enjoy rustic fall decorating and nature-inspired crafts, this DIY acorn wreath is a lovely project to add to your autumn decorating plans.
Supplies You’ll Need to Make an Acorn Wreath
Here are the basic supplies for this natural fall wreath:
- Styrofoam wreath form: This gives your wreath its shape and provides a surface for attaching the acorn caps.
- Brown grosgrain ribbon: Wrap the wreath form with ribbon so the foam is covered before you begin gluing.
- Acorn caps: Collect enough clean, dry acorn caps to cover the front of your wreath. The amount will depend on the size of your wreath form and the size of your acorn caps.
- Hot glue gun and glue sticks: Use hot glue to secure the ribbon and attach the acorn caps.
You’ll also want a work surface where you can arrange your acorn caps before gluing them in place.

How to Make a DIY Acorn Wreath
Step 1: Collect and prepare your acorn caps
Start by collecting acorns and saving the caps. One of the fun things about this project is that the materials come from nature, so the shapes and sizes may vary.
Separate the caps from the acorns if needed. Remove loose dirt and debris, then allow the caps to dry completely before crafting.
It’s helpful to gather more caps than you think you’ll need. You can sort through them as you work and choose the ones that fit together best.
Step 2: Wrap the wreath form with ribbon
Take your Styrofoam wreath form and brown grosgrain ribbon. Wrap the ribbon around the form, overlapping the edges slightly so the foam is covered.
Secure the ribbon with hot glue. Keep the ribbon smooth and snug as you work around the wreath.
The brown ribbon creates a warm background for the acorn caps and helps disguise any small spaces that may remain between them.
Step 3: Arrange the acorn caps
Before you start gluing, lay some of the acorn caps on the wreath form to get a feel for how they fit together.
Try placing them in overlapping layers. Varying the direction and size of the caps can give the wreath a fuller, more natural appearance.
Take your time with this step. Moving the caps around before gluing them makes it easier to create an arrangement you like.
Step 4: Attach the acorn caps with hot glue
Once you’re happy with the arrangement, begin attaching the acorn caps to the ribbon-covered wreath form.
Add a small amount of hot glue to the back of each cap and press it into place. Continue working around the wreath, layering the caps so they cover the surface.
Keep adding caps until the front of the wreath is filled in to your liking. Adjust their placement as you go to cover gaps and create an even, textured finish.
Crafting tip: Hot glue can cause burns, so work carefully and keep your fingers away from the hot glue and nozzle. An adult should handle the hot glue gun if children are helping with this project.
Step 5: Display your finished acorn wreath
Once the glue has cooled and the caps are secure, your acorn wreath is ready to display!
Hang it on an interior door, add it to a fall gallery wall, or use it as part of a seasonal display in your living room.
The natural brown tones work beautifully with wood accents, neutral decor, pumpkins, and other autumn textures.

Tips for Making an Acorn Cap Wreath
Make sure the caps are completely dry. Any moisture or loose debris can interfere with a clean crafting surface, so let your collected caps dry before attaching them.
Choose caps that fit together well. A mix of sizes adds interest, but arranging similar-sized caps together can help you cover the wreath more evenly.
Layer the caps for texture. Overlapping them creates a fuller look and helps hide the ribbon underneath.
Work in small sections. Arrange and glue a few caps at a time so you can adjust the pattern as you go.
Save extra caps. Having a few additional caps nearby makes it easier to fill in any bare spots at the end.

Where to Use Your DIY Acorn Wreath
This natural wreath is a lovely addition to fall decorating. Try displaying it:
- On an interior door or wall
- Above a console table or entryway vignette
- As part of a fall mantel display
- In a gallery wall with other nature-inspired decor
- Alongside pumpkins, wood accents, and warm fall colors
Because the design uses natural materials and earthy tones, it works especially well with rustic, farmhouse, woodland, and neutral fall decorating styles.
If you plan to hang your wreath outdoors, keep in mind that natural acorn caps and a foam base may not hold up well to rain and changing weather. A sheltered indoor location is a better choice.

More DIY Fall Wreath and Decorating Ideas
If you love making your own autumn decor, here are a few more projects to explore:
DIY Autumn Corn Husk Wreath for a rustic wreath with natural texture.
Metallic Browns and Gold Leaf Fall Wreath for a little shimmer in traditional fall colors.
10 Budget-Friendly Fall Decor DIYs for more ways to decorate for autumn on a budget.
This DIY acorn wreath is a simple way to turn a little collection from nature into something beautiful for your home. I love the rustic texture and the warm autumn feel it brings to seasonal decorating.
Gather your acorn caps, grab your ribbon and glue gun, and create a natural fall wreath of your own!




I have acorns in my own backyard, but they are a little different. They are long and skinny. I think it is a Black Oak. Anyways, I have been thinking about making a garland with them, but I love how you did the wreath with just the caps. Great idea!
I love this Maryann – it’s a little rustic and glamorous at the same time – pinning !
Thanks for sharing 🙂
Ohhh that wreath is lovely! I just love how acorns have such a rustic woodsy look about them. Very cool!
This is simply lovely, Maryann!
This is so pretty!
This came out great and I’m with Kim, I’ve never seen such large acorn caps! 🙂
Great idea! I have to admit, I’ve never seen such large acorn caps before ! Wow!
This is so pretty! It looks really great against the white 🙂
soooo pretty…xo