
DIY Silver Pear with Paint Crackle Effect
Have you ever found an inexpensive piece of decor and wondered how you could give it a completely different look with a little paint? That’s exactly what I did with these plastic pears!
I love the look of crackled paint. It gives an ordinary object a little vintage character and makes an inexpensive find look much more interesting. For this project, I took plastic fruit from Dollar Tree and gave it a shimmery silver finish with a fun crackle effect.
The best part? You don’t need an expensive specialty product to try this technique. White glue, paint, and a foam brush are the key supplies.
If you enjoy budget-friendly decorating, thrift store makeovers, and finding creative ways to update everyday items, this DIY silver pear project is a fun one to try!

Supplies for a DIY Paint Crackle Effect
(this links are affiliate links for your convenience – you can learn more about them here)
- Base coat paint: (spray paint or craft paint for the base) – you can also keep it the original color if you want
- white glue: Regular white craft glue is the key to creating the crackle effect.
- foam brush: Use a foam brush to apply the glue and topcoat.
- craft paint (for top coat): I used shimmery silver acrylic paint for the finished look.
- Plastic pears or other decorative fruit: Inexpensive plastic fruit works well for this budget-friendly makeover. (dollar stores are a great place to look)
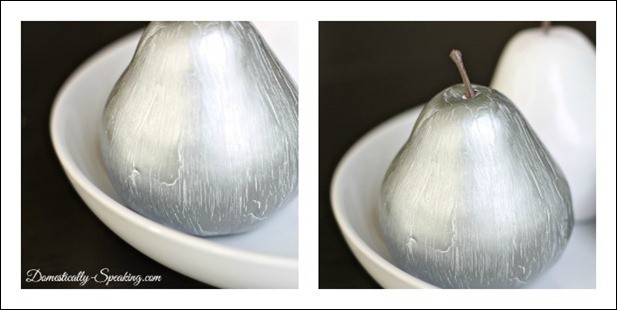
You can change the colors to suit your home. White over a darker base, metallic finishes, or other contrasting colors can create different looks.
How to Create a Crackle Paint Effect
Step 1: Prepare your plastic fruit
Start with clean plastic pears or another decorative fruit. If you’re reusing pieces you already have, wipe them down and allow them to dry.
If the fruit needs a base coat, apply your chosen paint according to the product instructions. Spray paint or craft paint can work, depending on the surface and product you choose.
I had already given my plastic fruit a creamy white makeover with spray paint before deciding to try this crackle technique.
Allow the base coat to dry completely before moving on. The contrast between the base color and the topcoat is what makes the crackled finish stand out.

Step 2: Apply the white glue
Once the base coat is dry, load a foam brush with white glue.
Brush the glue over the surface in single strokes, making sure you cover the area evenly. Try not to brush repeatedly over areas you’ve already coated, because the glue can begin to pull away from the surface.
Keep plenty of glue on your brush as you work. Replenish it as needed so you can cover the fruit without repeatedly going back over the same areas.
Step 3: Let the glue sit for five minutes
After covering the surface with glue, let it sit for about five minutes, as in my original tutorial.
You don’t need to wait for the glue to dry completely before adding the topcoat. The timing and thickness of the glue layer can influence how the crackle develops, so you may want to experiment on a small test surface first.

Step 4: Apply the topcoat paint
Now it’s time for the fun part!
Load your foam brush with your chosen topcoat paint. I used shimmery silver acrylic paint to give the pears a metallic finish.
Brush the paint over the glue using single strokes. Just as you did when applying the glue, try not to overlap or repeatedly brush over the same area.
Work carefully and cover the surface without overworking the paint. The goal is to leave the layers undisturbed so the crackle effect can develop as they dry.
Step 5: Watch the crackle effect develop
As the glue and paint dry, the crackled finish begins to appear.
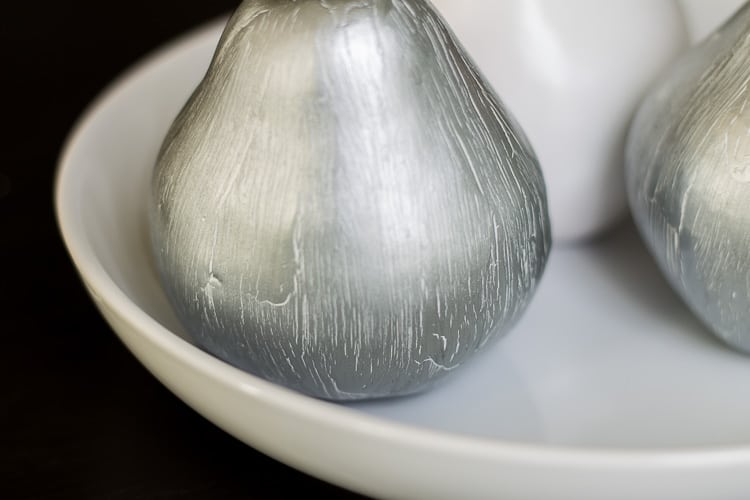
It’s fun to watch the surface change as the paint develops little cracks that reveal glimpses of the underlying color. The contrast gives the fruit an aged, textured look rather than a perfectly smooth finish.
The exact pattern will vary depending on the surface, the thickness of the layers, and the products used. That’s part of the charm of this inexpensive DIY technique!

Step 6: Display your finished silver pears
Once the paint has dried completely, your updated pears are ready to display.
Group them in a decorative bowl, add them to a shelf, or use them as part of a seasonal vignette. The shimmery silver finish works beautifully with neutral decor, metallic accents, and other decorative objects.
You can use the same general idea on other decorative pieces, too. Test the technique on a small area first to make sure the glue and paint work with the material.
Tips for Getting a Great Crackle Paint Finish
Let the base coat dry completely. Starting with a dry base helps keep the underlying color distinct from the topcoat.
Use a generous, even layer of glue. You want good coverage, but avoid repeatedly brushing over areas you’ve already coated.
Don’t overwork the topcoat. Apply the paint in single strokes where possible. Repeated brushing can disturb the glue layer and affect the finish.
Experiment with contrasting colors. The crackles are easier to see when the base coat contrasts with the topcoat. Try metallic paint over a creamy base or a light color over a darker base.
Test your technique first. Different paints, glue brands, and surfaces can produce different results. A small test piece lets you adjust your technique before working on the finished decor.
Be patient while it dries. Let the paint dry according to the product instructions before handling or displaying your finished piece.
Don’t they look cool! You can see a more detailed tutorial on this technique here, where I did my laundry room sign.
More Budget-Friendly DIY Decorating Ideas
If you love seeing what a little paint can do, here are a few more projects to explore:
DIY Indigo Handcrafted Vase — create a beautiful textured finish with paint and baking soda.
DIY Color Block Vase — give an ordinary glass vase a fresh, colorful update.
DIY Hobnail Milk Glass Candle — add a charming decorative touch to your home with a handmade candle project.
I love how a simple technique can completely change the look of an inexpensive decorative item. These silver pears are a great reminder that you don’t need to spend a lot to create something special for your home.
Grab a little paint and white glue, experiment with the colors, and see what kind of crackle finish you can create!




How did you make the stems?
Larissa the stems came on the plastic fruit I found at my Dollar Tree.
Very pretty! I really like the whole look.
Could you paint a clear drying paint or glue and add some glitter to look like candied fruit for Christmas decorating? I love the crackle too. Didn’t realize it was so easy.
I’d say it’s definitely worth trying… especially with items from the dollar store.