
DIY Autumn Corn Husk Wreath: A Budget-Friendly Fall Decor Idea


Looking for an inexpensive way to decorate for fall? This DIY corn husk wreath is an easy autumn craft that adds beautiful natural texture to your seasonal decor without spending much money. Inspired by a wreath I saw from Martha Stewart, I made my own budget-friendly version using corn husks and a small foam wreath form from Dollar Tree.
The best part? My wreath cost less than $5 to make, and the whole project took less than 30 minutes, including soaking the corn husks. The finished wreath has a lovely rustic look that works beautifully for fall decorating and Thanksgiving.

Why You’ll Love This DIY Fall Wreath
- Budget-friendly: The corn husks cost less than $3, and the wreath form was just $1.
- Quick to make: Once your supplies are ready, this is a simple project you can finish in about half an hour.
- Natural texture: The folded corn husks create a soft, layered look that feels right at home with autumn decor.
- Perfect for Thanksgiving: Display your wreath throughout the fall season or give one as a thoughtful hostess gift.
Supplies for a DIY Corn Husk Wreath
Affiliate links are provided for your convenience.
- Corn husks ($3, ethnic food aisle or produce section)
- 12-inch foam wreath form ($1, Dollar Tree)
- Hot glue gun and glue sticks
- Bowl of water for soaking
How to Make a Corn Husk Wreath
Step 1: Soak the Corn Husks
Place the corn husks in a bowl of water and let them soak for about 10 minutes. This softens the husks and makes them easier to fold without breaking.
Some of the inner husks may need a little extra soaking time, so check that they’re flexible before moving on.
Step 2: Let the Husks Drain
Remove the husks from the water and let them dry slightly. You want them damp and flexible, but not dripping wet.
Keeping the husks workable makes it easier to fold and arrange them around the wreath form.
Step 3: Fold and Glue the Corn Husks
Take one corn husk and add a small dab of hot glue to its wider base. Fold the thinner end over toward the glued section and press it into place.
Attach the folded husk to the foam wreath form. Arrange three husks in each row, repeating the process as you work around the wreath.
Tip: Be careful when working with hot glue, especially while holding the thin corn husks in place.
Step 4: Layer the Husks Around the Wreath
Continue adding rows of folded corn husks, overlapping each new row so it covers the base of the row before it.
Work your way around the entire wreath form, keeping the placement consistent while allowing the natural shape of the husks to create a little variation and texture.
Step 5: Finish Your Autumn Wreath
When you reach the starting point, tuck the final corn husks underneath the first row to create a neat finish. Make any small adjustments while the husks are still pliable.
And that’s it! You now have a simple, natural-looking corn husk wreath ready to display with your fall decorations.

- Soak the Corn Husks: Place corn husks in a bowl of water for 10 minutes to soften. Inner husks may need extra soaking for pliability.
- Prepare the Husks: Let husks dry slightly until damp but workable.
- Glue the Husks: Apply a small dab of hot glue to the wide base of a husk, fold the thinner end over, and press to secure. Attach folded husks to the wreath form, arranging 3 per row.
- Layer the Rows: Overlap each row to cover the base of the previous row, continuing around the wreath.
- Finish the Wreath: Tuck the final husks under the starting point for a seamless look. Adjust as needed while husks are pliable.

Tips for Making a Budget-Friendly Corn Husk Wreath
- Don’t worry about buying too many corn husks. I had enough left from one package to make at least four wreaths. The exact number will depend on the size of your husks and how full you want each wreath to look.
- Let the husks soften before folding. Soaking helps make them flexible and easier to work with. If a husk still feels brittle, give it a little more time in the water.
- Overlap the rows. Layering the husks helps cover the wreath form and gives the finished wreath its full, textured appearance.
- Make more than one. Since the materials are inexpensive, you can make several wreaths for different rooms or create one to give as a hostess gift.
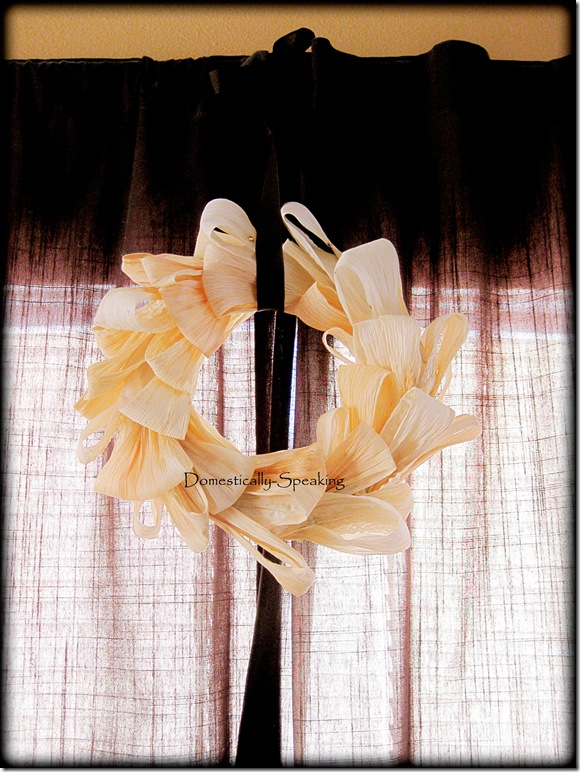
How to Decorate with a Corn Husk Wreath
This natural fall wreath is a lovely addition to a seasonal decorating display. Hang it on an interior door, use it as part of a Thanksgiving arrangement, or incorporate it into a larger fall vignette with pumpkins, leaves, and other natural textures.
You can also experiment with your own finishing touches if you’d like a more personalized look. Keep it simple and natural, or coordinate the surrounding decor with the warm tones of the corn husks.
I love how easy this project is, especially when you consider how little it costs. With one package of corn husks and an inexpensive wreath form, you can create a pretty autumn decoration without spending much at all.
If you make your own DIY corn husk wreath, I’d love to hear how it turns out!


it's beautiful! I love how loose the husks loops are
Now this is fabulous~ Well done!
That turned out so pretty! I love it!
I love how your wreath turned out! Great job – thanks for sharing!
Your wreath turned out better than Martha's wreath.
I made a fall wreath out of corn husk. I like it so well I decided to add gold bulbs and let it hang above the fireplace for Christmas.
Your wreath is fabulous!
Love it!! And your blog is great, I love everything I've read so far!
Oh my, I will have to give that a try. What a gorgeous wreath!
Your version is GORGEOUS! Great inspiration. 🙂 I am VERY late returning visits, but I wanted to say thank you for stopping by the other day. 🙂
@Cheap Chic Home. This turned out so pretty. Thanks for letting us know where to find the husks.
This is beautiful!
Lovely! I actually like yours better! Martha better watch out.
Very nice!!! 🙂 I think yours came out just fine. 🙂
How cute! I think I like yours better than Martha's! LOL Great job!
It looks great! I was wondering where to find the corn husks, now I know.