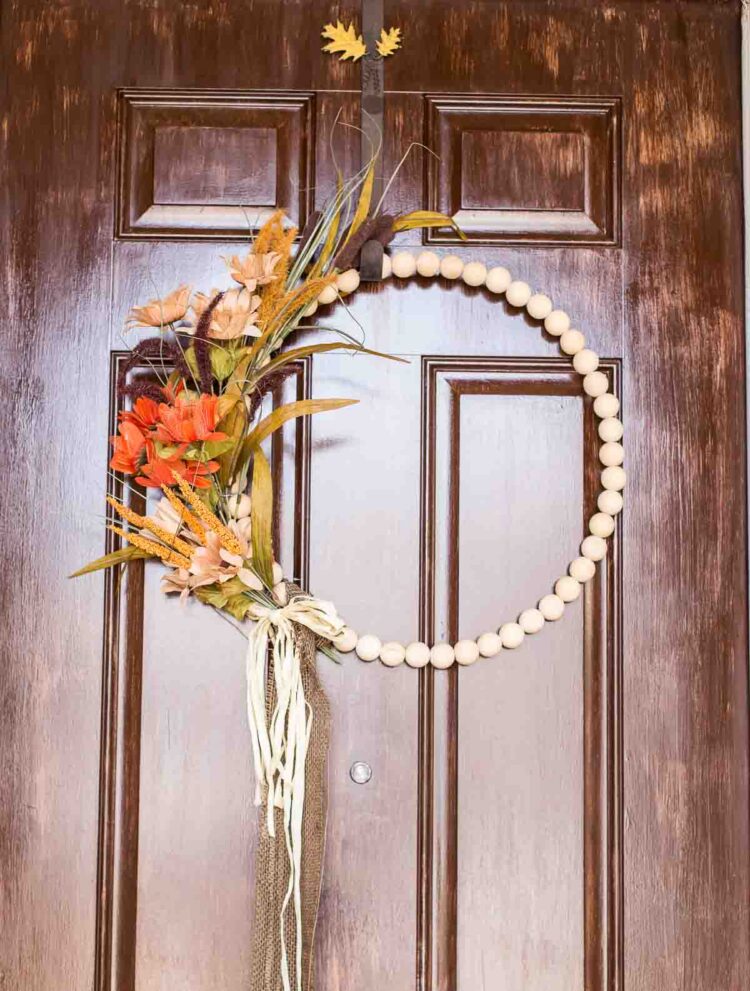
Easy DIY Fall Bead Wreath


Fall is the perfect season to refresh your home decor with cozy, handmade touches. If you’re looking for a budget-friendly project that’s both simple and stunning, this DIY Fall Bead Wreath is a must-try. Made using a wood beaded wreath form and affordable fall florals from Dollar Tree, it’s finished with pretty fall ribbon and burlap for that rustic charm. Whether you’re a crafting newbie or a seasoned DIYer, this wreath comes together in under 30 minutes and costs less than $20. Let’s dive into how you can create your own!

Why Make a Fall Bead Wreath?
A Fall Bead Wreath adds instant warmth to your front door, mantel, or wall. The wooden beads give it a modern farmhouse vibe, while the vibrant fall florals evoke the beauty of autumn leaves and harvest vibes. Plus, sourcing materials from Dollar Tree keeps it economical. I purchased the bead wreath at Hobby Lobby when it was 50% off. The rest of the supplies I found at Dollar Tree. I linked online sources you can purchase them at for your convenience below.
Materials You’ll Need
Affiliate links are provided for your convenience.
Step-by-Step Tutorial: How to Make Your Fall Bead Wreath
Supplies: Gather your supplies and then start to lay out your florals to get an idea of how you want them to look. I decided I wanted all of my floral arrangements on one side of my fall wreath. I went some grassy ones to the back, then layers of sunflowers between the grasses and other greenery. There’s no right or wrong way to layer it up, just play around until you get the look you love.

Add the Fall Foliage: Once you’ve got your layout, I gently moved everything over to the side, except for the bottom piece (which is the one you see up at the top).

Trim a piece of floral wire, about 6 inches long, and twist it around the floral stem and the bead wreath to attach. I twisted it 3-4 times to make sure it was secure. If you have extra wire sticking out you can trim it off. For some of the floral stems the base of the stem was sticking out too far off the wreath base. If that is the case just use your wire cutter to trim it back.

Then place the next further back piece on top of the one you’ve secured to the fall wood bead wreath. Repeat the process of attaching with wire.

Dress It Up with Burlap Ribbon & Raffia: After all the floral pieces are wired on I finished with a cute brown burlap ribbon and raffia to create a bow.
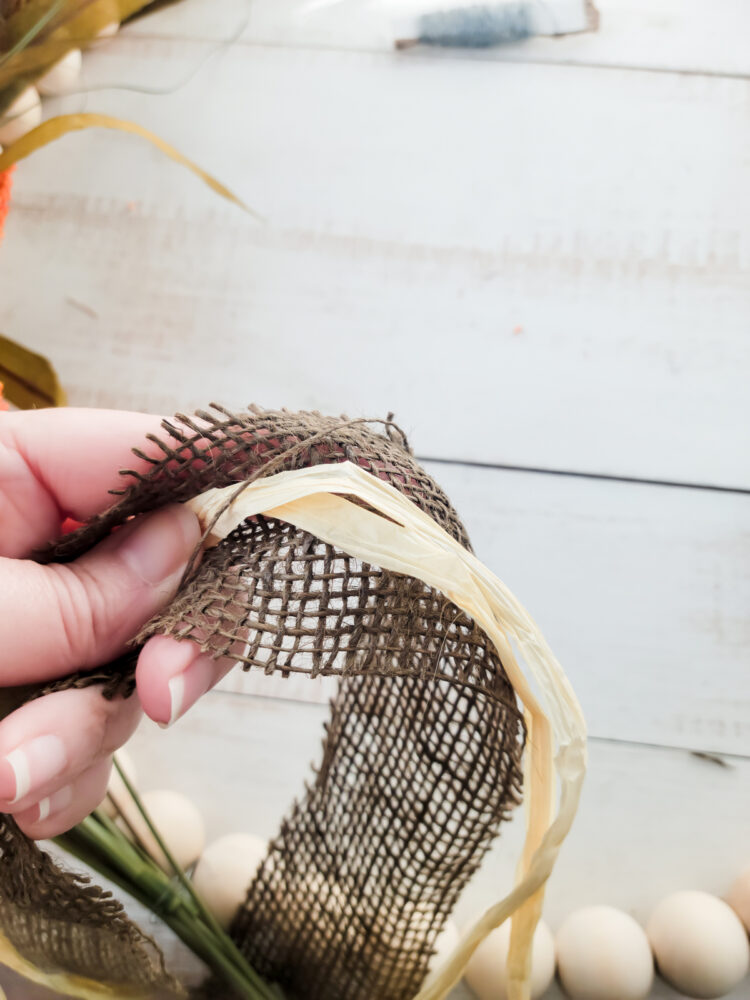
I layered the raffia on top of the burlap and then used tied at onto the wreath, near the base of the floral picks. I tied a double knot and then create the bow, that way it would stay on more securely.

Displaying Your Fall Bead Wreath:
Then it was time to hang my wood bead fall wreath. I had a cute fall leaf hanger that I used to place it on my front door.
Tips for Customizing Your Wreath
- Personalize It: Swap in faux acorns or mini pinecones for a unique twist.
- Make It Last: Spray with a clear sealant to protect against outdoor elements.
- Variations: Try a monochromatic scheme for a modern look or go bold with multicolored florals.