
How to Add Cane Webbing to a Headboard


Transforming your bedroom into a serene, coastal-inspired retreat doesn’t have to involve a complete overhaul. One simple yet impactful DIY project is adding cane detailing to your bedframe. This timeless material brings a breezy, natural texture that perfectly complements the laid-back elegance of coastal decor.

One of the easiest and most stylish ways to achieve that laid-back beachy vibe is by incorporating cane webbing into your bedframe. This natural material not only adds texture and depth but also brings a touch of coastal elegance to any space.
Why Cane Detailing Screams Coastal Style
Cane, a woven material derived from the rattan plant, has been a staple in furniture design for centuries. Its lightweight, organic look aligns seamlessly with coastal aesthetics, evoking thoughts of sandy shores, sun-bleached driftwood, and airy seaside cottages. Adding cane to your bedframe introduces texture and warmth, making it an ideal focal point for a coastal-inspired bedroom. Plus, it’s a budget-friendly way to elevate your space without buying a brand-new piece of furniture.
Materials You’ll Need
Affiliate links are provided for your convenience.
- Cane webbing (this is the one I used)
- Wooden bedframe
- Measuring tape
- Scissors or utility knife
- Hot glue gun and glue sticks

Step-by-Step Guide to Adding Cane Detailing
Here’s how to bring that coastal charm to your bedframe:
Measure Your Bedframe
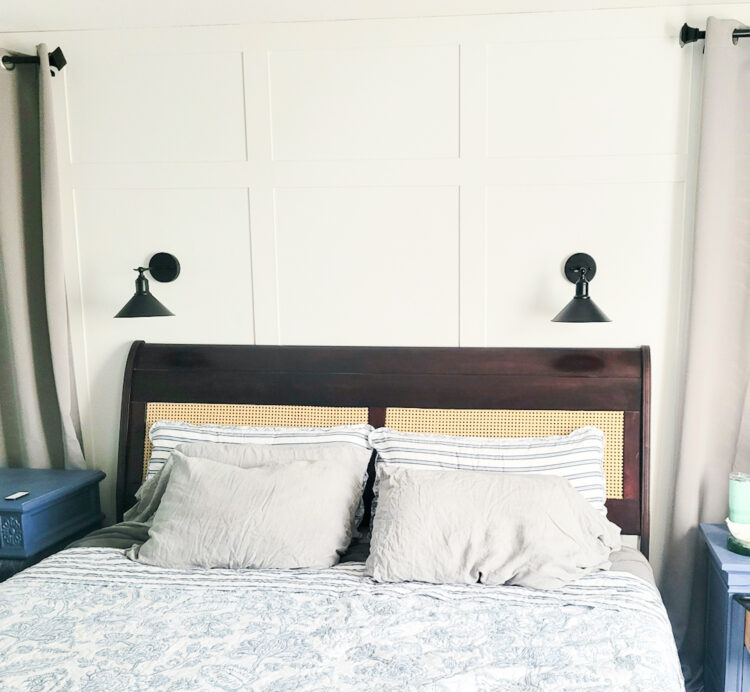
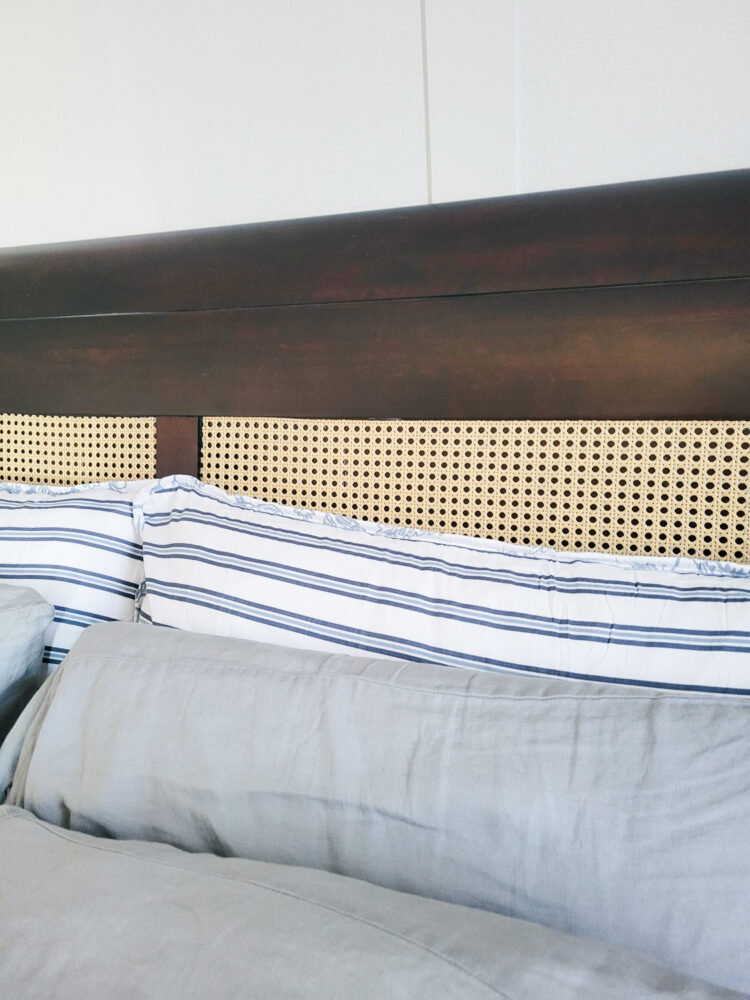
Start by deciding where you want the cane detailing—perhaps the headboard, footboard, or both. Measure the area carefully to determine how much cane webbing you’ll need. Add a few extra inches to each side for trimming and securing. Order the amount of cane webbing you need (link above). I wanted to add the cane to the inset areas on my headboard.

Prep the Frame
If your bedframe is unfinished or has a solid panel, sand it down to create a smooth surface. For a true coastal look, consider painting or staining the wood in a weathered finish like whitewash or driftwood gray before attaching the cane. My headboard was already a dark stain and I was loving the look of the dark stain with the light cane webbing that I spied over at Pottery Barn, so I was try to duplicate that look. If you stain or paint make sure it’s completely dry before moving on.
Soak the Cane Webbing
Soaking the cane webbing in your bath tub helps it lay flat. When you purchase the cane webbing it will come tightly rolled up. Unroll your webbing to the length of your tub, then fold it onto itself and repeat. Fill your bathtub with about 4-5 inches of warm water. You need it high enough to cover your cane webbing. I placed mugs on top of the edges to help keep it submerged. Let the cane soak for 30 minutes. Then place the web cane material onto some towels and let them sit for about 30 minutes.
Cut the Cane Webbing
Lay out your cane webbing and cut it to size using scissors or a utility knife. Remember to keep a little extra in your measurement.


Attach the Cane
Position the cane over the designated area of your bedframe. Starting at one edge, squeeze a long line of hot glue right at the edge. Place the edge of cane webbing on top, making sure it’s straight, and be careful not to touch the hot glue. You can use a wooden skewer or something similar to press down the cane into the hot glue. Let it dry for about 30 seconds. Then I added a line of hot glue to the top and bottom of the area, about 6″-8″ long, plus a line from top to bottom at that 6″-8″ spot. Carefully, pull it smooth and press the cane down, watching out for that hot glue again. Repeat until you get to the end of that section.

Repeat as Needed
Repeat the process in the other areas you want the cane webbing. Hot glue dries very quick! I let my finished project sit about 10 minutes before putting it back to admire.
Why This DIY Works for Coastal Bedrooms
Adding cane detailing to your bedframe isn’t just a trendy choice—it’s a practical one. The natural material is lightweight, affordable, and easy to source, making it ideal for DIY enthusiasts. Its subtle texture adds depth without overwhelming the space, which is key for the minimalist yet cozy feel of coastal design. Plus, cane pairs beautifully with other seaside staples like linen curtains, rattan lamps, and nautical artwork.

Styling Tips:
- Natural Accents: Complement your cane webbed bedframe with natural accents like seagrass rugs, woven baskets, or driftwood-inspired decor.
- Soft Textures: Enhance the coastal feel with soft, textured bedding in calming hues like seafoam green, sandy beige, or soft blues.
- Light and Airy: Keep the overall bedroom decor light and airy to maintain the coastal theme. Opt for sheer curtains, lightweight throws, and minimalist furniture.
Incorporating cane detailing into your bedframe is a budget-friendly way to infuse your bedroom with coastal charm. It’s a simple DIY project that delivers big on style, turning an ordinary piece of furniture into a statement of seaside serenity. Ready to give it a try? Your dreamy, beach-inspired bedroom is just a DIY away!


The cane webbing adds such beautiful texture and warmth to the headboard, it really captures that breezy, seaside feel without a full bedroom makeover. I especially appreciate the tip about soaking the cane first so it lays flat. This is such a budget-friendly way to create a high-end coastal look.
Love this coastal DIY! Adding cane webbing sounds like a great way to give a bedframe a beachy makeover. Have you tried any similar projects? What tips would you give for getting the cane just right? 🌊