
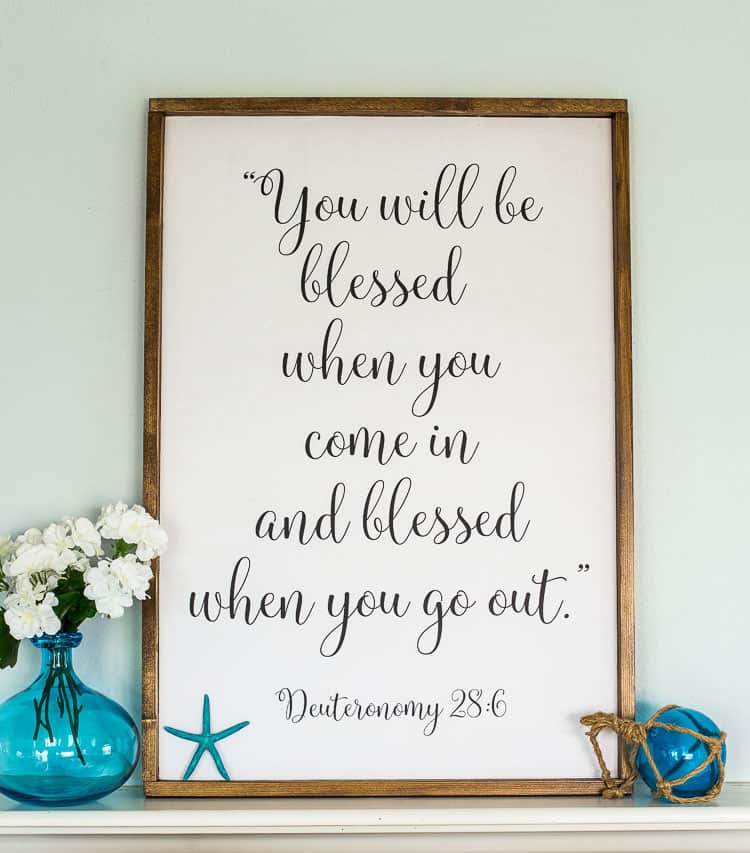
How to Make a Sign – Autumn Leaves and Pumpkins Please


Are you looking to add a personal touch to your home decor this fall? Learning how to make a sign is a fun, affordable DIY project that lets you create custom pieces like the charming “Autumn Leaves and Pumpkins Please” sign. Whether you’re decorating your mantel, porch, or walls, this tutorial will walk you through the process using simple tools and materials. I’ve used similar steps for other projects, like my large DIY sign, and it’s always a hit. Perfect for beginners, this DIY sign tutorial combines creativity with basic woodworking for stunning results.

Why Make Your Own Custom Sign?
Creating a custom DIY sign opens up endless possibilities. You can experiment with different sizes, sayings, paints, or stains to match any season or style. If you’re crafty and comfortable with basic power tools, this project is ideal for you. Not only is it budget-friendly—most materials cost under $10—but it also adds a unique, handmade element to your home. Imagine displaying your own fall sign ideas that perfectly capture the cozy autumn vibe!
Make a Sign
There are so many possibilities once you’ve had the fun of making one of these signs! You can make different sizes, different sayings… use paint or different stains on the sign sides. Only your imagination can limit you. If you can handle some basic power tools and are a little crafty, you can tackle this!
Supplies Needed to Make a Sign:
Affiliate links are provided for your convenience.
- engineer print
- particle board panel
- common board
- Mod Podge
- paint brush
- old credit card
- saw
- sand paper
- Kona stain
- rags
- nailer
How to Make a Sign:
Step 1: What is it going to say?
The first thing you need to decide on his what you want your sign to say. If you’d like to create your own Autumn Leaves and Pumpkins Please sign you can download the image I used here. (this is for personal use only)
Step 2: Create your font image
I use Photoshop Elements to create most of my graphics, but you could use Canva to create this sign too. Even a wood processing program like Word, or Google Drawings would work. My font graphic is an 18″ x 24″ size. So you need to make sure that you change your page settings first to your desired size. Then have fun creating your graphic. Get creative with fonts and sizes!
Step 3: Get that Engineer Print
So here’s the exciting part! I go online to Staples and I get this fun sign printed for just a few bucks. It’s called an Engineering Print / Blueprint. Here’s the location on Staple’s site: Engineering Prints. If I send it over in the morning, it’s typically ready by the end of the day at our local store.
Step 4: Lay your Print Flat
I place my print paper under something heavy to help it stay flat. The engineering prints are on thin, typical copy paper weight, so they want to curl when they are large like this.
Step 5: Cut your Wood Pieces
For the sign I created here I cut the base piece (the piece the sign will go on to) at 18.5″ x 24.5″. We had a scrap piece of particle board panel that just needed a little trimming. We used our miter saw to trim it down. Any piece of thin, smooth wood will work for the sign backing.
For the edges we used 1″ x 2″ common board pieces. These can be found at your local lumber / hardwood store… and these pieces are CHEAP! For a couple bucks you’ll have the wood for your trim. The top and bottom pieces are 17″ and the sides are 24,5″.
Step 6: Attach the Paper Sign to the Backing
You’ll need Mod Podge, a cheap paint brush and an old credit card for this step. A second set of hands will help too! Start by brushing on a generous, even coat of Mod Podge all over the particle board panel (or whatever you are using for the back of your sign). Then I started at the top of the sign and I carefully adhered the top of the sign to the top of the wood. My daughter was holding the bottom of the sign paper. I used my old credit card and slowly started to smooth and press the paper sign onto the wood. Working my way from top to bottom. My daughter slowly lower the paper with me as I was smoothing.

Now when your sign looks like this, all bumpy, DON’T FREAK OUT! I had gently smoothed over the sign before this photo. You don’t want to over smooth or press too hard or you can rip the paper! When the sign dries it will smooth out.
Step 7: Stain the Sides of the Sign
I used Kona stain for my sign (I LOVE this shade). Before you stain give your cut common wood pieces a sanding. Then take a wet paper towel and lightly wipe them down so I can easily remove any sawdust. I use an old rag to rub the stain onto the wood, doing it outside when it was in the upper 80’s. Then let the stain sit about 5 minutes and then used a clean rag to wipe off the excess stain. I love this stain because it dries FAST! After 1 hour I flipped the pieces and finished staining the other side. Once it’s all dried completely it’s time to assemble.
Step 8: Attach Sides to the Sign
I used my nailer to attach the sides to the sign base. If you’ve got a really steady hand you probably could just use a hammer and nail, but the nailer is SO MUCH faster & easier! A second set of hands here helps too. For my sign I placed the thin side against the base of the sign, so the thicker side is sticking out. You can make it how you prefer though. We shot the nails in through the backside of the sign into the sign edges, so no nail holes showing.

Now you get to stand back and admire your beautiful sign!

Once you know how to make a sign, your mind will be spinning on all the other ones you’ll want to make!


Tips for Perfect DIY Signs
- Avoid over-smoothing the paper to prevent tears.
- Work in a warm, dry area for faster drying.
- Customize further with paints or distressing for vintage fall wood signs.
- Experiment with sizes for versatile home decor signs.
Once you’ve mastered how to make a sign, you’ll be hooked! Your creativity will spark ideas for holidays, weddings, or everyday decor. Share your creations in the comments—I’d love to see them!


I wish someone had told me to expect my sign o be bumpy way before no. I actually destroyed a sign. It looked like the one you show here. No idea it would eventually smooth out.
Oh no! Yay… it initially looks like it’s not going to work.
hOW DOi SEND A PICTURE OF WHAT i DONE WITH YOUR picture?
Just love the font you used. Simple, but dramatic, drawing in the eye! You always have such beautiful and clever ideas.
Thanks Judy!