
Fall Frying Pan Sign
Have you ever spotted something at a thrift store and immediately imagined a completely different way to use it? That’s exactly what happened when I found a cute little frying pan at my local thrift store! I loved its color, and I knew it would be perfect for a fun fall makeover.
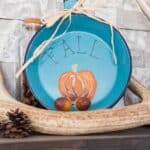
With a little acrylic paint, a Sharpie, and some raffia, I transformed that thrift store find into an adorable fall frying pan sign featuring a painted pumpkin. It’s a simple, budget-friendly DIY that adds a touch of autumn charm to your seasonal decorating.
The best part? You don’t need to be an expert painter to give this project a try. Let me show you how I made mine!

Supplies for Your DIY Fall Frying Pan Sign
affiliate links provided for your convenience
- frying pan
- orange acrylic paint
- white acrylic paint
- black acrylic paint or a thin Sharpie pen
- burnt umber acrylic paint
- paintbrushes
- raffia
Now if you’ve never painted a pumpkin, don’t worry! You can see a whole post on how to Paint Your Own Pumpkin Canvas.
How to Paint a Pumpkin on a Frying Pan
Step 1: Create the Pumpkin Shape

Start by gathering your paints and paintbrushes.
Using a flat paintbrush about ½ inch wide, dip the tip into orange acrylic paint. Begin by painting one side of the top of a heart shape, then reload your brush and paint the other side.
Flip the pan around and repeat the process to create the bottom of the pumpkin.
Round out the sides with your brush, then fill in the center with orange paint. Don’t worry about making the pumpkin perfectly symmetrical. A little variation gives your painted pumpkin character!


Step 2: Add Dimension with White and Orange Paint
Now it’s time to give your pumpkin some dimension.
Take the same flat brush and load one half of the brush tip with white paint and the other half with orange paint. Position the white side toward the top of the pumpkin, then gently drag the brush downward in a curved line.
Repeat this technique to create the curved sections of the pumpkin. These two paint colors help give the pumpkin a little more depth and definition.

Step 3: Add Shading with Burnt Umber
Next, use a thinner paintbrush to add some burnt umber acrylic paint.
Apply a little burnt umber near the bottom of the pumpkin, then lightly pull the color upward along the curved lines you painted earlier. This adds a shaded, dimensional look.
You can use more or less white and burnt umber depending on the look you want. Every pumpkin is different, so have fun experimenting with the colors!

Step 4: Paint the Pumpkin Stem
Once you’re happy with the pumpkin, add the stem.
I kept mine simple by painting a small triangle-like shape at the top of the pumpkin. You could make your stem slightly wider or more curved if that suits your style.
Allow the paint to dry before moving on to the lettering.
Step 5: Add the Word FALL
Using a thin black Sharpie, write FALL near the top of the frying pan.
Keep the lettering simple so the painted pumpkin remains the star of the design. If you’d rather use black acrylic paint, a fine detail brush can work, too.

Step 6: Finish with Raffia
For the finishing touch, tie a little raffia around the frying pan handle.
I love how this simple detail adds a natural, rustic feel to the finished sign. You could also experiment with fall-colored ribbon or twine to coordinate with your other autumn decorations.
And that’s it! Your thrift store frying pan has become a charming piece of DIY fall decor.

Displaying Your Fall Frying Pan Sign
This little pumpkin sign would be a fun addition to a fall vignette, kitchen shelf, tiered tray, or seasonal display. Pair it with mini pumpkins, a few fall leaves, or other thrifted finds to create a cozy autumn look.
I especially love projects like this because they encourage us to look at everyday objects a little differently. You don’t always need to buy new seasonal decorations when a little paint and creativity can transform something you already have.
If you enjoy giving thrift store finds a new life, be sure to explore my other thrift store makeovers for more budget-friendly decorating inspiration.
Happy fall crafting!

Frequently Asked Questions
Can you use any frying pan for this DIY fall sign?
A small thrifted frying pan is a great starting point. Choose one with a shape and color you like, and make sure it’s clean and dry before painting.
What paint works for a painted pumpkin sign?
This project uses acrylic craft paints in orange, white, and burnt umber, with black lettering added using a thin Sharpie or black acrylic paint.
Do you need painting experience to make this pumpkin sign?
No! The pumpkin is built from simple shapes and curved brushstrokes. You can adjust the shading and details to suit your comfort level.
How can I customize this fall frying pan sign?
Try different lettering, add a ribbon to the handle, or change the pumpkin colors to coordinate with your fall decor. You can also look for pans with interesting shapes or colors at thrift stores.
Note: This is a decorative craft. Do not use the pan for cooking after converting it into decor.
Other Thrift Store Ideas
Now there are a bunch of other great thrift store makeovers to check out from the rest of the team!

Frying Pan Sign from Domestically Speaking
Baroque Mirror Memo Board from My Repurposed Life
Paint Old Picture Frames from Petticoat Junktion
How to Paint a Basket from Our Southern Home
How To Make A Concrete Pumpkin from My Uncommon Slice of Suburbia
Halloween Ghost from a Wooden Cheese Board from Sadie Seasongoods
Rustic Birch Bark Vase from House Of Hawthornes


This is such an adorable idea for seasonal decor. It seriously looks like an item that i could by at Cracker Barrel. LOVE!!!
I would have never thought to make a sign out of a frying pan. You are so ingenious!
This is adorable Maryann and super creative!
The little frying pan is so cute! It really was perfect for this project.
Awesome tips for painting a pumpkin.
Pinning!
Gail
SO cute! That pan was the perfect color for this, too.
Adorable! Who would have thought to make a cute sign out of a pan!!
Tania